To remove varnish from your oil painting, start by evaluating its condition for any damage. Gather necessary supplies like odorless mineral spirits, soft cloths, and gloves. Apply the solvent to a damp cloth and gently rub the varnish in a circular motion, focusing on small sections. Change to a clean part of the cloth as it gets saturated. If you encounter stubborn spots, a palette knife can help lift it. After you’ve removed all the varnish, let the painting dry completely. Following these steps carefully can lead to better preservation, and you might discover even more helpful tips on maintaining your artwork.
Key Takeaways
- Inspect the painting for any signs of damage, like cracks or flaking, before attempting varnish removal.
- Use high-quality solvent, like odorless mineral spirits, and apply it to a soft cloth or cotton swab.
- Gently rub the varnish in small circular motions, changing to a clean section of the cloth as needed.
- Allow the painting to dry completely after varnish removal to prevent moisture issues.
- Store the painting in a stable environment, avoiding direct sunlight and dust accumulation.
Understanding Varnish and Its Purpose
What role does varnish play in protecting your oil painting, and why is it crucial for its longevity?
Varnish acts as a protective layer, shielding your artwork from dust, dirt, and environmental factors that can lead to deterioration. By sealing the paint, it helps prevent moisture from penetrating the surface, which can cause issues like mold or paint lifting. This layer also enhances the vibrancy of colors, giving your painting a polished finish.
Additionally, varnish can protect against UV light, which can fade your painting over time. Without this barrier, your carefully chosen colors might lose their brilliance and depth. It’s crucial to choose the right type of varnish, as different formulations can offer varying levels of protection and gloss. You’ll want to apply it only after your painting is completely dry, which could take several months.
Regularly varnishing your oil painting can extend its life and keep it looking fresh. Remember, though, that over time, varnish can become yellowed or cloudy, necessitating removal and reapplication.
Understanding varnish’s purpose is crucial for maintaining the integrity of your artwork and ensuring it lasts for generations.

Assessing the Condition of Your Painting
Before you begin removing varnish, take a close look at your painting’s surface to identify any signs of damage or wear. Inspect for cracks, flaking, or discoloration. These issues might indicate that your painting needs more than just varnish removal. If you notice any significant damage, consider consulting a professional conservator before proceeding.
Next, evaluate the overall integrity of the canvas or board. Check for any loose or sagging areas that could worsen during the varnish removal process. If your painting feels unstable, it’s essential to address these concerns first.
Look for areas where the paint might be lifting or detaching from the surface. If you see these signs, avoid using harsh solvents, as they could exacerbate the problem.
Also, assess the varnish itself. Is it yellowed or cloudy? Understanding the condition of the varnish helps you determine the best method for removal. Pay attention to the edges and corners, where varnish might’ve accumulated or worn unevenly.

Necessary Tools and Materials
Gathering the right tools and materials is essential for effectively removing varnish from your oil painting without causing further damage.
Start by acquiring a high-quality solvent, such as odorless mineral spirits or turpentine, which will help dissolve the varnish. You’ll also need a few soft, lint-free cloths or cotton swabs for application and gentle wiping.
A palette knife or a similar tool can be handy for lifting any stubborn varnish spots. Make certain to have a shallow container for pouring your solvent, as well as gloves to protect your hands from chemicals. A small, soft-bristled brush is useful for applying solvent to textured areas of your painting.
Additionally, prepare a well-ventilated workspace to guarantee safety while working with solvents. A drop cloth or cardboard can help protect your work surface from spills.
Step-by-Step Varnish Removal Process
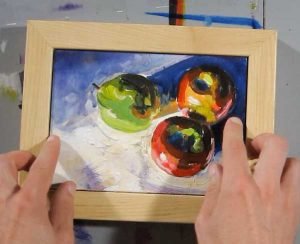
To successfully remove varnish from your oil painting, start by applying the chosen solvent to a soft cloth or cotton swab.
Make sure the cloth is damp but not dripping. Gently rub the varnish in a circular motion, focusing on one small section at a time. Avoid applying too much pressure; you don’t want to damage the underlying paint.
As you work, check the cloth frequently. When it becomes saturated with varnish, switch to a clean area or grab a fresh cloth. Continue this process until you’ve removed all the varnish from that section. You might need to repeat this step multiple times for thicker layers of varnish.
Once you’ve tackled the entire painting, take a moment to inspect your work. If any residue remains, lightly go over those spots again with the solvent.
After you’re satisfied with the varnish removal, let the painting dry completely.

Post-Removal Care and Maintenance
After successfully removing the varnish, it’s important to properly care for and maintain your oil painting to preserve its beauty and longevity. Start by allowing the painting to dry completely before exposing it to any environmental changes. This guarantees that the paint layer has settled and any residual solvents have evaporated.
Next, store or display your painting in a stable environment. Avoid direct sunlight, as UV rays can fade colors over time. Instead, opt for indirect lighting. If you’re displaying your artwork, consider using UV-filtering glass to protect it.
Regular dusting is essential. Use a soft, dry brush or a lint-free cloth to gently remove dust, but avoid any cleaning products. If the painting requires more thorough cleaning, consult a professional conservator.
Lastly, think about reapplying a protective varnish after a suitable drying period, which can enhance colors and provide a barrier against dirt and grime. Just make certain the painting is fully dry before doing this.
With these steps, you’ll keep your oil painting looking vibrant and intact for years to come.
Frequently Asked Questions
Can I Use Household Cleaners to Remove Varnish?
You shouldn’t use household cleaners to remove varnish. These products often contain harsh chemicals that can damage surfaces. Instead, opt for specialized varnish removers designed to safely and effectively tackle the task without causing harm.
How Often Should I Remove Varnish From My Paintings?
You should assess your paintings regularly, ideally every few years. If you notice dullness or yellowing, it’s time to contemplate removing the varnish. Keeping your artwork vibrant helps preserve its beauty and longevity.
Will Removing Varnish Damage My Oil Painting?
Removing varnish can potentially damage your oil painting if you’re not careful. You should use the right techniques and materials to minimize risk. Always test your methods on a small, inconspicuous area first.
Can I Reapply Varnish After Removal?
Yes, you can reapply varnish after removal. Just make certain the painting’s completely dry and clean. Choose a compatible varnish to avoid issues, and follow the manufacturer’s instructions for the best results.
Is It Safe to Remove Varnish From Valuable Artworks?
Removing varnish from valuable artworks can be risky. You should consider consulting a professional conservator first. They’ll guarantee the process is safe, protecting your artwork’s integrity while effectively removing the varnish without causing damage.
Conclusion
Removing varnish from your oil painting can restore its original beauty and vibrancy.
By understanding the varnish’s purpose and carefully evaluating your artwork, you can safely proceed with the right tools and techniques.
Remember to take your time and follow the steps closely to avoid damaging the paint beneath.
After you’ve removed the varnish, don’t forget to provide your painting with the care it needs to thrive in its renewed state.
Enjoy your revitalized masterpiece!